Keeping things on a level with Levelator

I need to level the audio on some files so they have the same Loudness – and that means Levelator!

levelator

My first audio task is to ensure that the output audio level of 3 audio files is within a roughly equivalent Loudness value. I will try to achieve this more comprehensively, but for now, I looked for a simple tool I used to use called Levelator.

This program does not seem to be in the Repositories so I had to download the tar ball from their site at http://www.conversationsnetwork.org/levelator. Their download instructions warn me that I will need Python 2.5 and wxPython installed. So, it may not work the first time. OK then…

Then I tried to unpack the tar ball (a compressed file, like  a ZIP file) by right-clicking and choosing ‘Open‘, but Studio tried to open using Mousepad (a text editor) – D’oh! That won’t work.

Selecting ‘Open With Other Application‘, I was able to look through my installed software to see if I could find tar to do the job (or maybe even try with ZIP or RAR?). I couldn’t find anything that seemed to fit the bill.

So, by typing:

whereis tar

into a terminal window, I could see from the result (/usr/lib/tar etc.) that tar is indeed installed on my system, so this looks like it’s going to be terminal work. So, to extract the file I am going to use the following switches:

  • x = extract files
  • v = verbose (so that I can see all proceeding happily)
  • j = bz2 archive
  • f = use the following tar archive for the operation

So, I typed:

tar -xvjf /Levelator-1.3.0-Python2.5.tar.bz2

where path to file in my case is /home/gary. Hmm… it tells me that the “Compressed file ends unexpectedly, perhaps it is corrupted?” and that I can use the -tvv option to repair (didn’t work), or the bzip2recover program to try and fix the archive. That didn’t work either.

Call for Noah and his Ark!

I’m a bit unsure as to what to do at this point, so I re-downloaded the archive in case I had managed to download a corrupt version and searched through the software packages for bzip2, and found an Archive manager called Ark. Let’s Install this.

Sadly, Ark reported that it was unable to open the archive as no suitable plugin had been found. Grr..

Have to report a FAIL so far on this one then.

Solution Found

So how did I manage the job in the end?

I loaded each file into Audacity on a separate track. Then by selecting Effect->Amplify I discovered that a pre-generated value was suggested for me to normalise the sound files. Woohoo! Simple to apply the suggested amplification (each one different) to each file and then save each track out as a separate file using File->Export Selected Audio! Piece of Cake! 🙂


Hunting the Blue Griffin

The first job I have on hand is to edit some web pages, so I chose the Blue Griffin web design package.

Blue GriffinThe first task I have to do is update some broken links on my website at celticmythpodshow.com so the best application I seem to have found for the job so far is a suite called Blue Griffin available at http://bluegriffon.org/. I downloaded the package from their site and extracted it to a folder in my home directory. I’m not sure that this is where it should live, but when I ran the executable it all seemed to work well.

The next problem was that the application did not appear in the system menu. (Oh, I have now switched back to Whisker rather than the Applications menu as I managed to lose many items from the menu). So, after a bit of googling I found this thread https://ubuntuforums.org/showthread.php?t=2220891 that showed me others had experienced similar options using MenuLibre – which is the recommended menu editing application.

My menu Alacarte

A lot of people seemed to bemoan the lack of Alacarte, so I search for a way to install the program manually. So:

sudo apt-get install alacarte

seems to install the program with no problems. And yes, it appears in the system menu as Menu->Settings->Main Menu. I found I also had (just below) Menu->Settings->Menu Editor and after investigation, I found that this was the dreaded MenuLibre program that everybody reports so many problems with. So, it is NOT recommended to use this.

Running Alacarte, I went to the Development category and added Blue Griffon‘s executable in as a new Launcher. It does not seem to come with an icon sadly. All ready now to go and do that web editing – when done, I shall need an FTP program to upload the files.

Full Steam ahead

steam_logo_white_on_blackWanting a bit of a breather from the research, I tried to install the Steam game launcher, but it refused to install from the Menu->System->Software option on the Menu. Eventual;ly I went to the Steam website at http://store.steampowered.com/ and clicked on the install Steam button there. It downloaded the launcher and ran Steam perfectly. Hoorah! A small subset of my Games library (those with executables written for Linux) is now accessible again!

How to get the Volume Control button back

For some reason, there was no easy way to turn the volume up/down. The little mixer button in the notifications are of the panel had disappeared. So I went to Applications->Settings Manager->Panel. Then I chose the Items tab, clicked on the ‘+‘ button and chose the Indicator Plugin from the list of optional extras.

I then used the Up (or down) arrow on the Right-hand side of this tab to position the indicator where I wanted it, made no other changes to the settings, and clicked Close.

Oh yes! One little Volume Control button now back where it should be! 🙂

I’m on Parole with media player problemettes!

Just tried to watch a video with the built in Parole Media Player – and it failed! Oh no, first problem!

VLCSo, before finishing off the day and getting some convalescence I thought I’d watch a quick video. There seems to be only one Media Player built into Studio: Parole. Sadly, it wouldn’t play my video which was a *.MKV video. I’m too tired to try and figure out the CODEC problems and I know that VLC is a light and powerful media player, so I headed on over to their website at https://www.videolan.org/vlc/ to grab some serious VLC action!

So, I found the Download page that seemed to be the right one for Studio, and opened myself up a Terminal.

sudo apt-get update
sudo apt-get install vlc browser-plugin-vlc

Success! I now have Media Playback->VLC media player on my system menu and can watch my video. A nice, easy fix (although technically I’m still on Parole 😉 )!

Now to try a little Ardour

Step 2 in the installation of Ubuntu Studio is to give it full functionality and make sure that the Ardour DAW is installed!

ardourSo happy that I have a working system and having taken my faltering steps on the learning curve, I’m ready to update the system to include all the latest packages. So using the system menu, I clicked on System->Software Updater. I allowed it to install any updates it wished to.

Once the Updater had completed, I then went to System->Ubuntu Studio Meta Installer and ticked all of the options to download. I clicked on Install and then went off to make some Breakfast! This is where I should get my DAW, Ardour, installed for me!

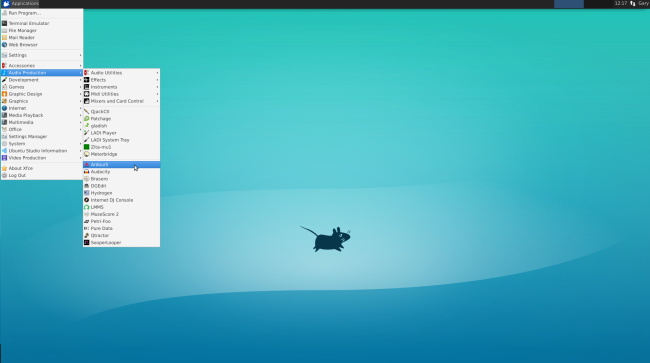
Eventually, it completed the installation and asked for a system restart, which I did. I started up (with an alarmingly large amount of background processing going on!) eventually to a sparkling new system. The screen shot below is of the system menu showing that all the development software has been nicely installed (I hope) and that Ardour is sitting there waiting for me as indeed is Audacity! Yippee!

screenshot_2016-11-04_12-17-43
My new Desktop – click on image to enlarge


The Podcaster’s Studio in Linux

After yet another frustrating and disappointing experience with Windows, I’m making a fresh, updated and serious attempt to use Ubuntu Studio as a platform for our Podcast.

Audio_mixer_fadersAfter yet another frustrating and disappointing experience with Windows, (which I spoke about elsewhere), I’m making a fresh, updated and serious attempt to use Ubuntu Studio as a platform for our Podcast. As I make a change to the configuration of Studio fresh from its shiny wrapper, I shall update this blog to document my steps. So that I shall be able to see, if/when it all goes horribly pear-shaped, what I have to do to get back to the last known fully-working state. For that reason, it is just as important to record failures as it is successes. For my own benefit, as well as anyone else that may/may not be following my procedures, it is vitally important that I record the successes or failures as I progress.

To summarise my needs, I’ll briefly explain that I need a computer as a Digital Audio Workstation (DAW), a graphical design environment, a place to write and compose and finally, to provide me with the tools to maintain our website(s). I also use my PC for web browsing (the inevitable Book of Face) and for playing games as R&R. By switching to Studio as my primary OS, I will lose access to the majority of my Steam library which is a serious Pain. I have to ask myself whether working or playing is more important – and, for me, there is no contest.

So…

Installing Ubuntu Studio for the first time

I used my laptop to download the latest Studio ISO (version 16.10) and made a bootable USB Flash Drive from it. Next, started my PC from a cold boot, pressing F8 for the Boot selection menu. I chose the USB DISK as the boot device and, once loaded, chose to install Studio. I chose not to install any 3rd party proprietary drivers of META packages at this time as I could always do that later, and I just wanted a clean install to start with. So, I entered the installation details as normal, i.e., location, user account, timezone etc. – and away she went!

A little while later, 1 nice fresh little dual monitor, blue XFCE mouse displaying an installation of Studio that was ready to use. Interestingly enough, Studio did not find any USB drivers to power the interface to my 3rd Monitor so I’m still down to just the two monitors. A problem to try and fix later, I feel! 🙂

Filebot for renaming Video files

I wanted my first task to be a simple one. Having experienced a superb application in Windows called Filebot that will happily rename and organise Video files, I was overjoyed to see that a Linux version of this program was available. So.. onto the task with gusto!

I headed on over to the Filebot website at http://www.filebot.net/ and chose to download what I thought was the most likely installation choice for my 32-bit installation of Studio – “filebot_4.7.2_i386.deb“. I selected ‘Open in Software Manager’, entered the root p/w and clicked Install when it came up.

I found it had added a menu entry for filebot under Video Production, but when I clicked it – nothing happened. A bit confused. So, I opened a Terminal window and

So, I opened a Terminal window and just typed:

filebot

at my user command prompt. Head-desk! An error message that politely informed me that I didn’t have Java installed. Now I knew that Filebot required Java, but for some reason I completely forgot at the critical moment – d’oh! So where to find an installation of Java?

Well, I found the following Q&A on the Ubuntu forums and it looked both recent enough and simple enough for an eedjit like me, so:

sudo apt-add-repository ppa:webupd8team/java
sudo apt-get update
sudo apt-get install oracle-java8-installer

to add the Oracle repository, refresh and install Java. Everything proceeded without a hitch. The tutorial then asked me to set an envirnment varibale with:

 export JAVA_HOME=/usr/lib/jvm/java-8-oracle

Worked like a charm. Now to test the program. I clicked on the menu entry, and Bingo! the app launched beautifully! Happy Gary!

Success.

Lost luggage

I have an old Acer Aspire 5742Z laptop, which in the grand scheme of things is known as ‘luggage’. It has a 320 Gb HDD that is probably becoming rather faulty. Both the Windows 7 and Linux Mint installations are crashing regularly and I have since reformatted it to hold Mint alone (no Windows – yay!). But… it still keeps losing data, checking the disk for errors and crashing..

So, let’s Backup any changes..?

I can’t afford a new hard drive for the old beast, so an online or network based backup system to restore the Mint installation with all of the changes  I have made or will make seems to be a super solution.

The Software Manager seems to offer no tempting solution with the terms ‘cloud backup’ or ‘backup’ apart from Dropbox, that I am already using for work data, so I opened the Synaptics Package Manager and searched again. This time I found two likely looking chaps: deja-dup and cinder-backup. So, I duly marked them for installation, applied, entered my root password and waited.

A sense of Deja-vu?

I couldn’t find cinder on my main men, but Deja-dup appeared with the name ‘Backups’, so I clicked on this. It then presented me with a window with 5 options:

  1. Overview
  2. Folders to save
  3. Folders to ignore
  4. Storage location
  5. Scheduling

All seems pretty reasonable. Overview tells me I have no recent backups and none scheduled. Two big hints 🙂

Folders to Save?

I want to do an entire backup of my Mint installation, so that seem to me like everything from ‘/’ (root) downwards. I clicked on the Folders to Save option and navigated to ‘/’ and then clicked ‘Add’. I removed the suggested ‘home’ backup, as I am after a complete system backup.

Folders to Ignore?

The next option is to choose which folders will be ignored from the backup set, and it suggests the Rubbish Bin (fair enough and the contents of my Downloads folder. Hmmm… that will have to go. If I download any PDFs or manuals or anything, I don’t want to lose them on a restore. So I click on ~/Downloads and then the ‘-‘ button and the option disappears.

Storage Location?

This is where you can enter the path to any location for your backup. I am going to use an external hard drive, but you could use a cloud or whatever in this instance. So I click on the ‘Local Folder’ drop-down and choose my external drive. I thne have to enter a path in a text fields so I enter:

/DejaMintBAK

as the path name (and cross my fingers!).

Scheduling?

Under scheduling the Every Week/Month/Day option is greyed out… strange? And the system wants me to save the backup ‘forever’. Ah, I see the problem- there is a big ON/OFF slider at the top of the dialog window and the backup is turned OFF, so I slide this to the ON position. It then gives me the choice of Day/Week for the frequency and I choose ‘Day’. At the moment, whilst I’m configuring the system, and I probably am going to lose everything due to hard drive crash I’m opting for greater security.

How to get it all going?

So, how to get it all happening? I assume that at a certain time a CRON job will kick it into action, but I’d like tosee the first backup happen now to verify that all of the settings are good. Back to the Overview screen, it tells me that the next backup is today and there is a big button for me to press to ‘Back Up Now’! Guess what? I’m going to press the button..!

And it fails… It cannot create the directory: permission denied.

I then create the directory manually  on the external hard drive, and run the Backup again. Fails with the same error message. Hmmm… maybe the ‘/’ option is global and it needs the mount point of the external hard point for an accurate path?

The full path is:

/media/<username>/<External HDD name>/DejaMintBAK

So I enter this into the ‘Storage Location’ text entry box, and (crossing fingers), try again!

Ooh, it looks like it’s working. Now’s it’s asked me for an Encryption Password, so I enter one….and Away it Goes!!

Woohoo!

Follow up – November 2015

Have tried for a few months now and the destination drive I have for backups is also faulty! (rats!) So far… no backup 😦

Linux Mint Beginner’s Guide

OK, I confess. I thought I’d stop searching the net for hints and tips, and bought the ‘Linux Mint Beginner’s Guide‘ by Jonathan Moeller, Azure Flame Media, 2012. It’s pretty cool and I sailed through the first ha;lf with no problems. All clear and only restating what I already knew.

Checking disk status

First I loaded System Monitor from the main menu. This is a GUI tool that shows me the status of my hard drive as well as the processes and resources that I have running. A bit like the old Windows Task Manager. I have used 33% of the HDD space, so I have plenty left. Now, ho to find the process in a terminal.

The top command used in a terminal shows me some really useful information that is updated in real-time. Looking through the processes I can see that there are no Samba (smb*) processes running, so that may explain why I have no sharing on my computer. ‘t‘ sorts the processes by CPU time, ‘l‘ by load average and ‘m‘ by memory used. If I wanted to I could kill a process by taking note of its number (the PID) and typing ‘k <PID>’. To test this, I launched the Image Viewer from the main menu and spotted the brand new process eog pop up in the top list in the terminal window. Cool. It has the PID of 3501. So, typing

k 3501

and then confirming the termination signal, does indeed kill the process. OK, I am armed for bear! ‘q‘ to quit and on with exploration.

df -h

Shows me a list of my attached devices, but I am mainly interested the hard drive which tells me I have 45Gb free and I’ve used 34% of the available space. Hmmm… I may have to use gparted later on to shrink the windows partition further and expand myLinuxx ext4 partition to get more space!

New, Improved Vim – for all those difficult stains!

Now I can learn to use the vi text editor from the terminal for quick and dirty configuration file editing! mwah-ha-ha! Just typing

vi

into the terminal launches a blank vim window; vim being the Improved version of vi. Using vi to call vim has already been established for me by the installation process – cool!

OK, the first problem is that the welcome screen tells me to press ‘q‘ and ENTER to exit vi, but it doesn’t work. OK, my fault – I didn’t read it properly, type

:q

and press enter. No problems. So, let’s try creating a text file by trypeing

vi test.txt

Apparently vi starts in normal mode with PAGE UP/DOWN, HOME & END moving about the file. I type in a dummy sentence to test and find that dw/de (no space) delete the word following the cursor, and d$ deletes to the end of line. OK, that works but I’ve deleted my test line so type some more in. I notice the backspace key doesn’t delete backwards but merely moves the cursor backwards. The cursor keys also do interesting things!!

dd deletes the entire line and p inserts the text from the last deletion at the cursor. Ah ha! So, I haz a copy/paste function! Pressing CTRL-G shows a status line and I can see that the file hasn’t been saved so it doesn’t exist yet. Pressing / for search is a handy way of moving around the document. Now to find out how to save the file.

Command me now!

Apparently I need to move from normal mode to command mode if I want to save the file. More later.